
Click for Part 2, Part 3, Part 4, Part 5, Part 6, Part 7 and Denzel the dog 🙂

I found this fantastic pattern online and decided to have a go at adapting it to make The English Family Andersons’ bus 😀

The beauty of this pattern is that the bus can be played with inside and out. As I type, Miranda is making little people (the Andersons) to live in it 😀

So, I began with red for the outside of the bus …

… and then made another piece in multi-coloured yarn for the inside. The Andersons have decorated their home very colourfully so I did what I could, with the colours I had, to reproduce their bus interior.

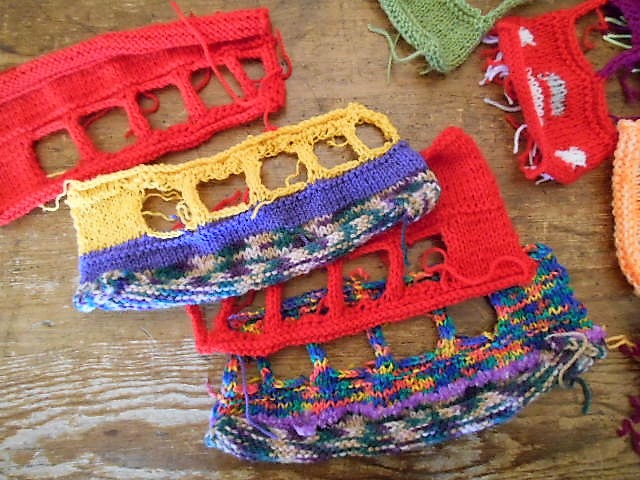
I made the other outside and the other inside long side of bus and then made the front and back ends, inside and out:

I ran out of bright red yarn, so I had to finish the outside of the bus in the closest colour I had which was a sort of burgundy. I decided that it didn’t matter because the colour of old buses does fade 🙂 Of course at this point I am not following the VW camper design, I’m trying to make it look like Old Red.

The outside piece for the front of the bus includes the colours for the headlights, number plate, radiator and the bus number above the window.
So that was eight pieces done – four insides and four outsides. Then it was time to add some buttons 🙂

The Anderson’s bus has two headlights on either side so I sewed some white buttons in position for them. Unfortunately I don’t have any bright orange buttons for the indicators so I had to leave that for now. I might add those with yarn later.

I added some black stitches to the radiator. Then it was time to start putting it together.

To make the bus rigid, the campervan pattern provides templates to cut out pieces of plastic grid to fasten between the knitted pieces, however I decided to make these out of card. I flattened out a knitted piece as well as I could on some stiff cardboard, drew round it and cut it out. I didn’t cut out the individual windows, just one big window to go between the knitted windows. The knitted frames is all that’s needed to separate them. You’ll see what I mean. The cardboard inserts need to be sized so that the knitting needs to be stretched taut to cover them.

I pinned together the top and one end of the inside and outside of one side of the bus with wrong sides facing together. Then I sewed it.

Then I put the matching cardboard cut-out between them and stretched the knitting flat across it so that I could pin it in place at the bottom and opposite end. I finished sewing all the way round the outside and then around the window frames. I sewed the inside and outside knitting of the window frames together, tucking all loose ends inside, out of sight. As I’ve said before, I am not neat at needlework, but that doesn’t matter. It seems to work out somehow.

That’s all I’ve got so far but I’m looking forward to putting the rest of it together. Then I can get started on the furniture! I’ll keep you posted 😉
*************
******************
homemade, knitting, crafts, handmade, toys, knitted toys, knitted bus, model bus, handmade toys, homemade toys, vegan, vegan comics, vegan children’s stories

This toy bus is delightful! 🙂
LikeLike
Thank you 😀 So glad you like it 🙂
LikeLiked by 1 person
What a great idea!
LikeLiked by 1 person
Glad you like it 😀
LikeLike
What a fun project!
LikeLike
It was fun, when you’re in the mood for knitting 😀
LikeLiked by 1 person
I remember these buses. Yellow submarines too.
LikeLiked by 1 person
😀
LikeLike
Wow so beautiful and a wonderful post.👍👍👍👍👍👍👍👍👍
LikeLike
Thank you for so many thumbs up 😀
LikeLiked by 1 person
Always welcome friend.
LikeLike
🙂
LikeLike
A knitted bus! Can’t wait to see the finished article!💕
LikeLike
Thank you, me neither 🙂 Nearly there 🙂
LikeLike
What a cute idea!
LikeLike
Thank you 🙂
LikeLiked by 1 person
This is fabulous! I look forward to seeing it finished. 🙂
LikeLike
Thank you 🙂 me too 😀
LikeLiked by 1 person
This is so awesome. We have got to make this for our little travel van.
LikeLike
It is a brilliant pattern, yes you should definitely make one 😀
LikeLiked by 1 person
This makes me smile 😀
LikeLike
I’m so glad 🙂
LikeLike
Woohoo!! Wow, this one looks even more challenging than Reflecto Girl!!! But some can achieve anything they put their minds to!
LikeLike
It is challenging but the anticipation is very exciting 🙂 I’m nearly there now 🙂
LikeLiked by 1 person
Awesome!!!
LikeLike
Thank you 🙂
LikeLike
Wow!! This looks like a really popular fun activity! Perfect for rainy winter days 😀
LikeLike
Yes, you’re right, it is even more fun when you can hear the wind and rain raging outside 🙂
LikeLiked by 1 person
😀 totally!
LikeLike
😀
LikeLike
This is the most adorable thing I have ever seen! So cool! Amazing!
LikeLike
It is a brilliant pattern, I’m having a lot of fun with it 😀
LikeLike
How beautiful!! What a great idea 🙂 😀
LikeLike
Thank you 🙂
LikeLike
Wow how exciting!!! 😀 I love it! I don’t know how you do it!
LikeLike
I just follow the instructions 😀 So glad you love it, me too! 🙂
LikeLike
That looks fantastic! I ll make one in January, once the Xmas fair stall madness is over 🙂
LikeLike
Great! Send us a photo when you do 😀
LikeLiked by 1 person